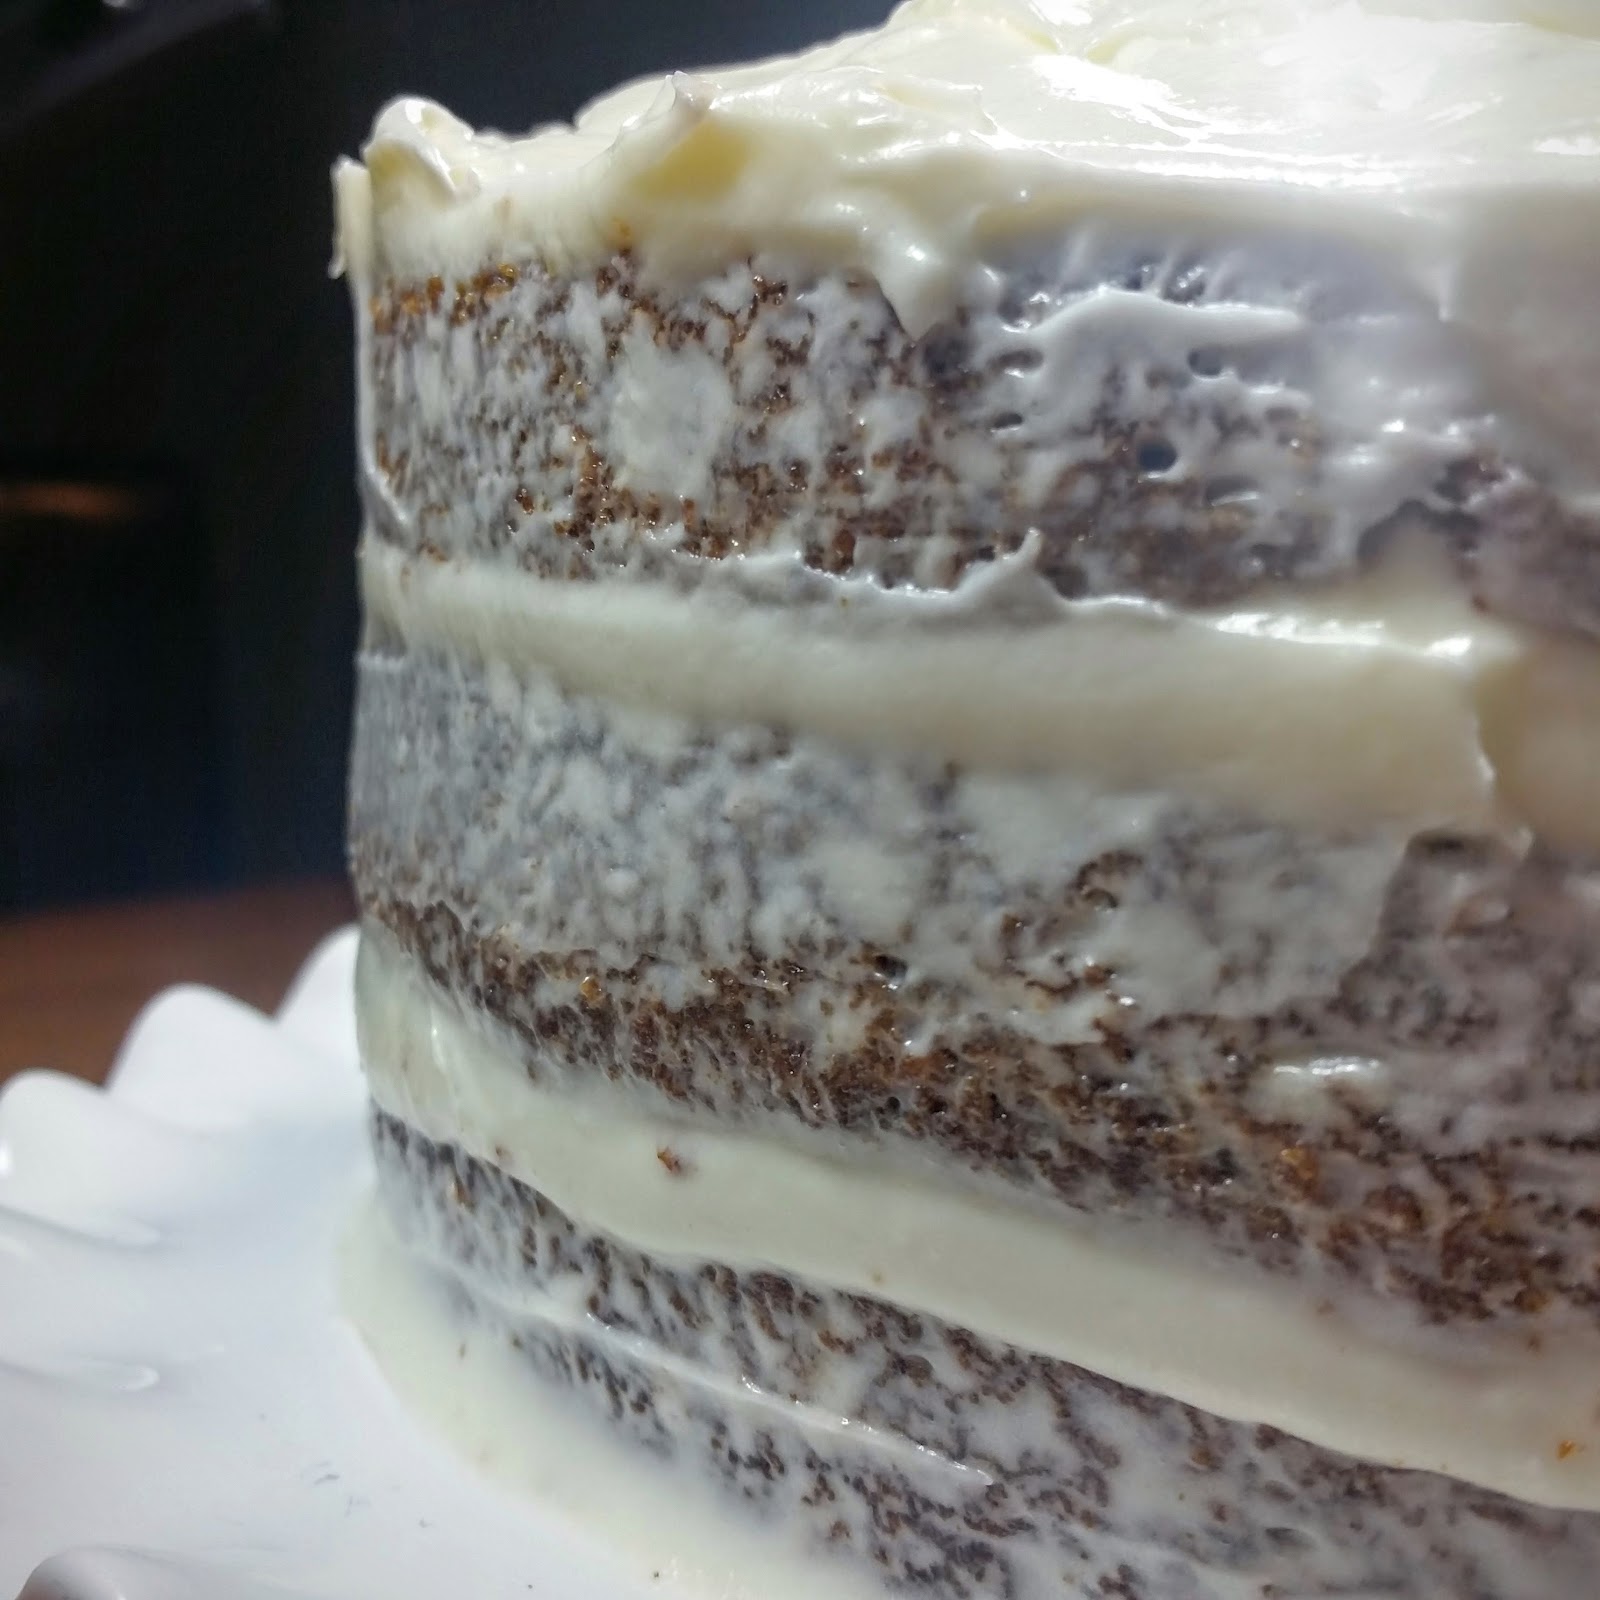
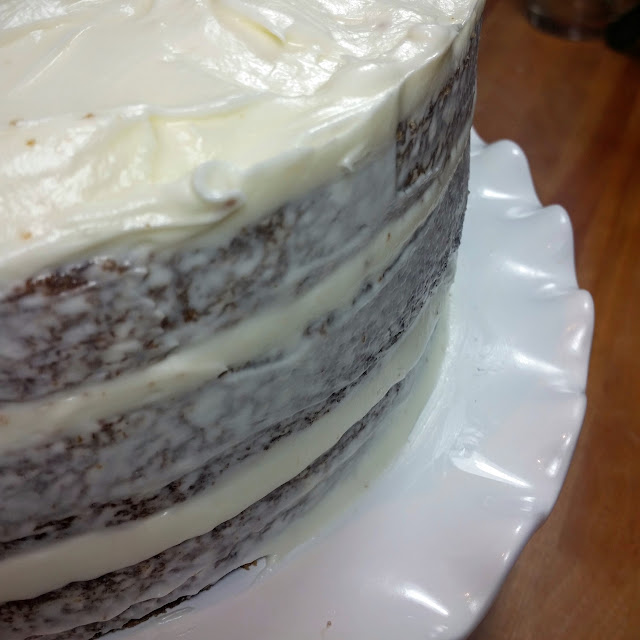
Wednesday, February 3, 2016

Simply Perfect Carrot Cake


love carrot cake, it is by far my favorite of all cakes. Birthdays, anniversaries, just because, it's my go to. I try to avoid buying it if possible, especially from a supermarket, I find they tend to be far too sweet, and dry (but that's probably a good thing, or I'd be buying it every time I went shopping!). This recipe I've tweaked over the years, is simple, easy to follow, and it has worked every time. It makes a beautiful moist 3 tiered cake, which I like to frost 'naked', now some people when frosting in this way put no frosting at all on the sides of the cake, just between the layers and on top. I don't particular like this, as the sides exposed to air tend to dry out. So I like to go over the sides lightly with frosting, but you can still see the cake layers.


Ingredients

Softened butter, for pans
2 cups all purpose flour, plus extra for pans
1 cup sugar
1 cup light brown sugar
2 tsps baking soda
2 tsps ground cinnamon
2 tsps mixed spice*
1 tsp salt
1 1/2 cups vegetable oil
4 eggs beaten
3 cups of corsely grated carrots
½ cup golden sultanas, soaked in apple juice
1 1/2 cups chopped pecans

Frosting:

2 8oz packages cream cheese (room temperature)
1 stick salted butter (room temperature)
4 cups powdered sugar

Preheat oven to 350F, butter and flour 3 x 9" round pans, then line the bottom of the pans with parchment paper.


In a large bowl, combine flour, sugar, baking soda, cinnamon, mixed spice and salt.


Add the beaten eggs and vegetable oil and stir with a spatula until combined.


With the sultanas, I put them in a bowl, cover them in apple juice and microwave them for a few seconds, when ready to use I drain them off.
Fold in the carrots, golden sultanas and pecans.


Pour into pans and bake on the center tray for approximately 23 minutes. 


With the baking time, it seems quite presise, and this is for my main oven, with two pans just above the center and one just below center. I have a double oven, where the top oven is half the size of the main, I've found it takes a lot longer to bake in there, and I've had to eyeball it, so I recommend baking in the main oven if you have a double.

Once a toothpick just comes out clean, from the center of the cake, remove from the oven and let cool for 5 minutes. 

To remove from the pans I carefully tip the cake upside down, gently onto my hand, then turn it back the right way up onto a wire rack, leaving the baking parchment on the bottom. Leave to cool completely.


While the cake is cooling, add the butter and cream cheese into a mixer bowl, and with the paddle attachment, beat the two together into a smooth mixture. Then add the powered sugar, a cup at a time, on a slow speed, that way it's less likely to create a cloud of sugar in your kitchen. Once all the sugar is added, you can turn the speed up and beat until it is light and fluffy. Then if you are like me you'll have refrain from eating the frosting before there's not enough for the cake, it's so simple, but so good. 


Once the cake is complete cooled, remove the parchment paper, lay one of the cakes on a stand (or whatever else you'll be displaying your cake on) and top with 1/4 of the frosting. Repeat with the next two cake layers, then use the last 1/4 of the frosting to lightly cover the sides, if there is any left over I add this to the top.


All that is left to do now, is enjoy! Tea and cake anyone? 


*Mixed Spice is used in a lot of English cooking, and is absolutely wonderful


Thursday, October 22, 2015

Afternoon Tea Etiquette

Afternoon tea, come with several do's and don'ts.


Afternoon tea, High tea, cream tea...
Scones first

Afternoon tea is a light meal around 4pm and was meant to tide over the gap between lunch and dinner, which amongst the upper class was around 8pm. As we are not the aristocracy from the early 1900's, nowadays this is a treat and not a daily occurrence (even thought I could certainly take afternoon tea everyday, but alas...). 

There is a lot of variation nowadays on what afternoon tea consist of, but traditionally there would be a variety of finger sandwiches, typically salmon, cucumber, and egg. Scones with clotted cream and jam. Then finally cakes and pastries. The order in which these are eaten varies, if the scones are on the top tier, this goes back to the days when the scones came covered in a dome to keep them warm, and would be eaten first, then the sandwiches, and finally the cakes and pastries. So if your scones are on top, or listed first on the menu, by all means eat them first. If the scones are on the middle tier, or everything is just laid out, it's perfectly acceptable to go, finger sandwiches, scones, then cakes and pastries.


Sandwiches first, working bottom to top.
Don't call it 'High Tea'. High tea was a meal the servants had in the early evening, and consisted of a more substantial meal. There are some Hotels in London who advertise their Afternoon Tea as High Tea, as they have a lot of foreign visitors who use this misnomer. 

Cream Tea consists of tea served with scones, clotted cream, and preserves, which is traditionally strawberry jam. The scones should be plain, and are spilt with the fingers in two, then the half you are going to eat first, is topped with cream and jam. The cream first, is known as a Devon cream tea, and that's my personal preference. If you choose to top your scone with jam first, that would be a Cornish cream tea, again it's down to personal preference.


Tea Set 

If you are hosting afternoon tea, the first thing you obviously need is a tea set, which consists of a teapot, sugar bowl and creamer. For the sugar bowl you will need a sugar spoon, or tongs if you are using cubes. If you are using loose leaf tea, you will need a strainer and a plate for it to rest on.


Old Country Roses Tea Set

Each person will need a teacup and saucer, plate (I tend to use a salad plate, a dinner plate is far too large) and flatware. For the flatware, if you have spreaders, they are perfect for the scones, but a butter knife is also good. Finger sandwiches, shouldn't require any utensils. Then the cakes and pastries, will need their own serving knives should they need to be sliced or tongs as required, with cake forks and dessert spoons for the place setting. Also serving spoons as needed for the cream, jam, and any other condiment you may have. If you have more modern items on the menu, mini savory tarts or mini desserts in shot glasses for instance, you'll need to add to the flatware for each place setting accordingly. Finally each person will need a teaspoon and napkin.

To serve there are a variety of accessories, the three tiered stand being the staple. There are also two tiered stands, cake plates and stands, as well as a sandwich platters, on which you can present your offerings.

If you plan on serving champagne, each person will also require a champagne flute, and possible you may need an ice bucket.


Do's and Don't 

Napkin should be folded towards you and placed in your lap, when you have finished, lay it on the table next to your plate. Do not ball it up, and do not place it on your plate.

Do pour your tea first before adding milk.

Don't swirl the tea around the cup with the spoon to stir it, use a back and forth motion, making sure you don't make lots of noise by hitting the side of the cup.

Do not leave the spoon in the cup.


The teacup is always meant to be resting on the saucer, when you are not drinking from it. If you move away from the table with your cup, the saucer goes with you, and you rest the cup in it. Even if you are just sat back from the table, hold the saucer in your lap, and rest the cup on it. 

Do not 'cup' the teacup with your hands, it is held carefully by the handle. 
When holding by the handle, and this is one of the biggest misconceptions, you do not extend your little (pinky) finger. 

Don't while holding the cup swirl the tea around inside it.

Do sip, don't gulp or slurp.

Do not dunk things in your tea.

Do eat sandwiches with your fingers, by taking small bites.

Do not eat sandwiches with a knife and fork, and never put the whole thing in your mouth at once.

Do pronounce scone "skon" and do spilt by hand. Don't use a knife.

Do put cream and jam on bite sized pieces of scone or acceptable also, the individual halves.

Don't sandwich the halves of the scone back together.

Pastries and desserts should be eaten with a cake fork, upturned in the right hand.

Finally dab not wipe, with your napkin when you are finished.


If I have  missed anything you think should be included, please let me know.

Stephanie.


Saturday, October 17, 2015

Traditional Scones

If you ask anyone to describe afternoon tea, scones are bound to be mentioned. Normally having their own tier on a three tiered stand. They are even the main focus of cream tea, with clotted cream and jam. Traditional British scones are plain and slightly sweet, but its common for the addition of raisins, sultanas, currants, or glacé cherries. Even savory varieties with cheese, onions, and bacon are available widely in England.


Since I've been in the States, I don't recall seeing what I know as a scone. The American version, which has become more ubiquitous with the spread of coffee shops everywhere, are more dense, dry and triangular in shape; and I don't think I've seen a plain one, they are always some flavor, and commonly have icing on. Vanilla, with a vanilla glaze; pumpkin with a spice glaze; blueberry with a lemon glaze, are all common examples, and are usual eaten on their own, along side coffee.

So the only way I'm going to get a traditional British scone, is to make them myself. I'm going to stick to the plain variety. I remember my grandma making these all the time, these and malt bread, they were always on the go in her kitchen when we would go round.


The ingredients are all basic items, with one exception, the addition of the clotted cream after the scones are ready. Fresh clotted cream is a gift from the gods, but alas not available anywhere I've seen. I've even tried to source unpasteurized heavy cream at every place I could think of where I live for, 50 miles in every direction. I read online that some Whole Foods carry UHC, not the one closest to me (which is an hours drive away). In the hope of creating my own clotted cream, there are several 'how to' pages on Pinterest, which look amazing, so if I ever do find some unpasteurized, I will definitely be giving that a whirl. So given all that, I found some jarred clotted cream online, and as where I live is hot 10 months out of the year, I chose a seller who shipped it cold packed. 
**this post was later than intended, as the seller didn't ship for 10 days, then they posted it late in the day on Tuesday and they didn't arrive until Friday, can't say I was too impressed with that**


Ingredients

2 1/4 cups Self Rising Flour
1tsp Baking Powder
1/4 tsp Salt
6 Tbsp Cold Unsalted Butter
3 Tbsp Granulated Sugar
7oz Buttermilk
1tsp Vanilla Extract

To Serve: Clotted Cream, Preserves

Makes 8 scones
Preheat oven to 425F *once the oven is preheated put your empty baking sheet in*
Equipment: Baking sheet, Pastry cutter (optional), 2" scone/biscuit cutter.

First measure out the flour into a mixing bowl, cut the cold butter into cubes and measure out the salt and baking powder.


Stir the salt and baking power into the flour before then adding the butter.


Now here is the optional part on the method, where I live it is hot, I'm always hot, even with the AC going, so I choose to do this part with a pastry cutter. If I did this the way my grandma did, by rubbing the flour and butter together with her fingers, I'd have a melted mess, and we want to keep that butter cold, to give the scones their light fluffy texture. So use a pastry cutter or use your fingers, whichever works best for you.


Work the butter and the flour together until you have a fine crumb consistency.


Next stir in the sugar, I'm all for making as little washing up as possible, so I just used the measuring spoon.


Heat the buttermilk in the microwave for 15-20 seconds, until just warm then add the vanilla extract to it. Make a well in the middle of your flour/butter mixture and pour the buttermilk mixture in there.


Working quickly with a regular dinner knife, mix the two together, to make a wet sticky dough.


Dust your work surface and hand well, tip the dough on to the floured surface and then give the top of it a good dusting of flour also.


Only fold it a few times on itself then shape it into a 1 1/2" thick round, I got the ruler out as I always underestimate just how thick that is


Nice and high!


A 2" cutter might seem a little on the small side, but its one of the best sizes for scones, remember they will grow in size slightly during baking. To cut the scones out give your cutter a dip in flour first, then get as many as you can on your first run. I used a fluted cutter, as that's what my grandma used, but a straight sided one tends to give a more even rise while baking.


I got four from my first run, bring the remaining dough together and you should be able to get another four, depending on how close to the 1 1/2" thickness you were.


Once you have all your scones cut out, beat the egg slightly in a bowl, to use as a wash.


When egg washing the top of your scones, try not to get any on the sides as it can give you an uneven rise. Transfer the scones on to the hot baking sheet from the oven and then bake for approximately 12 mins until they are risen and golden on top. 


Once baked and golden on top, then can be eaten warm straight away, or cooled and eaten later.


Scones form a line across them during baking, which is perfect for splitting them in two with your fingers. It's not proper afternoon tea etiquette to use a knife to cut them, freshly baked scones should split with ease.


The preserve commonly served with scones is strawberry jam, but you can use which ever is your preference. I had some lovely homemade lemon curd, so I used that, wonderful!


Warm scones, clotted cream, lemon curd, & tea.


As I mentioned earlier, the etiquette for eating scones is not to use a knife to cut them, also you shouldn't use a fork to eat them either. If you have spreader, they are perfect, a butter knife would also be good. Spread on your cream and preserves and then use your fingers to eat them.


Cup and Saucer: Royal Albert Old Country Roses Cup and Saucer
Jar: Weck Mini Jar
Spreader: Discontinued, Royal Albert, Old Country Roses, I got mine from eBay.
Clotted cream: Clotted Cream 6oz
Pastry Cutter: Pastry Cutter Stainless Steel
Scone/Biscuit Cutters, Fluted: Stainless Steel Round Biscuit Cutters with Fluted Edge, Set of 4
Scone/Biscuit Cutters, Straight Sided: Endurance 4 Piece Stainless Steel Biscuit Cutter Set

I hope you give these traditional British scones a try.

Happy baking, Stephanie.